That first summer, the riding was great, if not a novelty. You get lots of heads turning when you are spotted on a fat bike in the summer. You have to work harder climbing, but I have never shied away from work. In fact, I always overpacked my Camelback, believing I would get a better workout hauling more weight uphill. It also made for a great excuse when I’d summit last in the group.
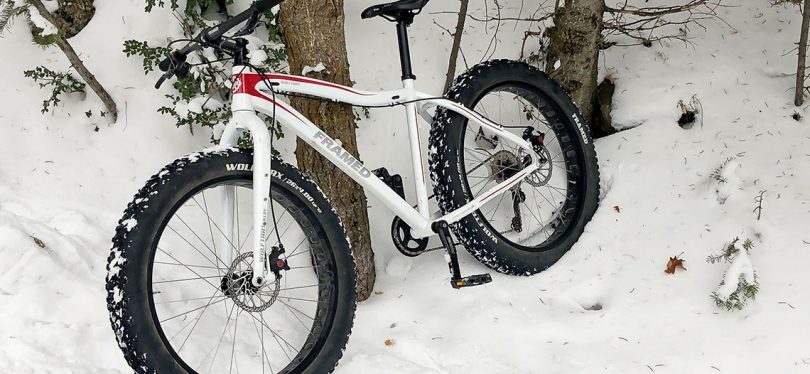
Fast forward to my first winter (2018/2019) and I realized that, as a new fat bike owner, I wasn’t quite prepared for winter riding. My spring gloves and winter boots—along with some bits of nordic skiwear were fine for my first notable winter ride—a two-plus-hour loop at Park City’s Round Valley, with 40º temps and clear skies.. But I knew I would not always be so lucky, so I took to facebook and queried a bunch of folks to get a consensus on the three most important pieces of equipment one needed for winter riding.
Warm Boots…Duh!
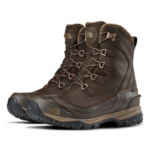
The NorthFace ChilKat Boot
Coming in at number one was boots. This seemed like an obvious choice, because even though most people ride on packed, user- and/or machine-groomed trails, eventually you will put your foot down in the deep stuff. Several riders endorsed the 45NRTH Wolvhammer. With a gusseted tongue, a full-grain leather and ballistic nylon shell and a dedicated gaiter ring on the toe box, the two-bolt compatible Wolvhammer is a great boot. Perhaps it’s the best. That being said, it will set you back a whopping $325 (REI). Others, myself included, claimed that flat pedals and decent winter boots would do the job. Either way, a gaiter solution will complete your footwear solution. I have some great The NorthFace Chilkat boots ($130) and a pair Mountain Hardwear Chockstone pants with a cinching cuff. Works for me.
What the Hell are Pogies?
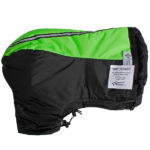
Dogwood Designs Poagie
Coming in at a close 2nd were pogies. Pogies are those funny looking bags winter riders attach to the ends of their handlebars. On my first couple rides, I did fine with a pair of waterproof Sealskinz spring gloves and Outdoor Research Meteor mittens. But I have not yet ridden in the worst weather, so I took this recommendation to heart. Pogies work like sleeping bags, creating a pocket of warm air around your hands without compromising circulation or dexterity. Gloves and liners can get bulky and eventually fail to keep your hands warm. We have a couple Pogies recommended by readers. Dogwood Designs Poagies will set you back about $135 (fatbikes.com). 45NRTH makes the Cobrafist pogie, about $115 (REI).
A Good Stud is Not Hard to Afford
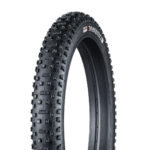
Gnarwhal Studded Tire
I’m going to skip the 3rd place recommendation becasue it was glaringly obvious: warm clothes/warm gloves. Instead, we’ll skip to the 4th place recommendation: studded/wider tires. I can speak from experience here. On my first ride, the most challenging aspect was keeping my uphill traction. Momentum helps, as did adjusting my technique. Essentially, I found that keeping my tire pressure low and unweighting my bike—at the right part of every pedal stroke—helped me stay on my pedals.
But there were moments where a good studded tire would have helped for sure. The bad news is good studded tires aren’t cheap. One of our readers suggested the Bontrager Gnarlwall 3.8 studded tire. While these are great, they will set you back as much as $225 each! When I consider my bike cost me around $700 US, you can see why I would decide to stick with non-studded tires. But if budget is not an issue, go for it. In the meantime, I do plan on upgrading from 4″ tires to the 4.8″ maximum size my bike can handle.
The Kitchen Sink
I’m going to end this with a few recommendations that I found worthy. One was a high-volume, low pressure pump. Makes sense. Other recommendations included buffs, drop posts and goggles. All worthy recommendations for winter fat bike essential gear.
Feel free to comment and, if we get some good ideas or if our poll results change, we will revise this article accordingly.