Summer is always around the corner and we’re hearing from more and more people about bikepacking tips. If you’re planning a trip this year, might enjoy this article by Kurt Refsnider, who offers some great advice on planning a bikepacking trip.
You can be a well-seasoned backpacker and a dedicated mountain biker, and have had plenty of success putting the two together on long bikepacking trips, but planning a bikepacking trip route can still be a little intimidating. All the camping gear, all the shiny bikepacking bags, and the strong desire to strike out on a trip you charted yourself are great, but I hear all the time from bikepackers who aren’t quite sure how to pick the best routes.
Something is holding them back – either they don’t know where to go, or what to expect along the way and how to plan for the unexpected.
I’ve spent the last decade charting both short and expedition-scale bikepacking adventures all across the globe, and I’ve learned many lessons about some of the most productive ways to plan for trips and how to increase my own confidence about what sort of experience I’m likely to have.
Champing at the bit to get out on your own self-planned trip? Get immersed in the details and do some homework The opportunities for adventure are limitless, so start with some goals before beginning to plan and research a specific route.
No. 1: Set specific and realistic goals for planning a bikepacking trip
Whether or not you consciously realize it, adventures large and small are based on goals. Bikepacking trip goals could be anything from, “Let’s spend 3 days riding 100 miles of smooth gravel and enjoy ourselves with relaxed evenings and mornings at camp,” “We’re going to ride a published route across Utah as quickly as we can, pedaling all day and sleeping all night,” or “Is it possible to ride singletrack from Point A to Point B in the five days we can get off work?”
Goals will help set the tone for the trip, so giving some serious thought to just why you’re heading out and what kind of experience you desire is critical. And if you’re traveling with buddies, make sure everyone in your group is on board with those same goals.
No. 2: Decide whether to choose your own adventure
The ease with which you can plan a route will vary widely depending on your trip goals and how creative you wish to get with where you decide to pedal. Following well-established routes with ample planning resources can make life quite easy.
On the other hand, poring over maps and satellite images to link up your own route will require a much greater time investment. This also often results in notably more uncertainty about just what sort of experience you may have once your tires hit the dirt. But that’s kinda the best part.
No. 3: Following pre-developed routes
If you choose to follow a route others have ridden and shared information about, you should have a good idea of roughly what to expect. As such, the research should go quickly for your planning.
Great places to start looking for route options include Bikepacking.com, Bikepacking Roots, bikepacking.net, and the Adventure Cycling Association.
Long rail-trails and single-day mountain bike race courses offer additional options for multi-day rides. You should be able to find GPS data, maps, water and food resupply information, and potentially even trip reports pretty easily for many such routes.
But carefully assess what the riding experience might be like — some of these routes are purely dirt road affairs, some are dominated by technical singletrack, and some have a diverse (and occasionally peculiar) mix of everything from pavement to excruciating hike-a-bike.
Be sure that your identified goals align with the riding experience the route you’re considering is likely to offer.

Check with a local bike shops or bike club to figure out what the conditions are like before you confirm your route.
No. 4: Creating your own adventure
Perhaps your trip is going to traverse a landscape through which other bikepackers rarely travel. Maybe you’re seeking more adventure than following someone else’s GPS track.
This is the realm in which I often find myself. Being here requires accepting that no matter how much time you put into researching a possible route, what you encounter along the way will provide surprises, occasional disappointment and possible dead ends.
As you start to try to link together trails, 4×4 tracks, dirt roads, etc., you can pull from a variety of resources. Mapping interfaces like TopoFusion or RideWithGPS offer a variety of base map views, and you can combine those with trail information from TrailForks, MTB Project, topographic maps, state gazetteers, Google Maps, and more.
If you love maps, this can be a very rewarding process:
- Identify a few possible ways to connect Point A to Point B to Point C,
- Pay close attention to elevation gain, surface or trail type, land ownership, and whether or not bike travel is permitted.
All that will determine how long a section might take or whether you may encounter locked gates and no trespassing signs.
No. 5: Research is the key to planning a bikepacking trip
Once you have a tentative route plan, it’s time to do some more in-depth research. While following someone else’s route directions, or drawing lines on a map and following them are in theory relatively easy, preparing for what’s actually on the ground requires more attention to detail.
Here are a few things to research while planning your bikepacking trip:
- route conditions (reach out to local bike shops, Forest Service or BLM offices, etc.);
- volume of climbing on each leg;
- location and distance between reliable water sources;
- food resupply options (so you can better plan out how much food and water to carry at a given time);
- location of public land on which you can camp?
- Is the dirt rideable when it’s wet, or does it turn into impassibly sticky clay mud?
- Might the highest parts of your route be snowy? Or might he lowest parts be inhospitably hot?
Plan all this out, make some notes to carry, and make sure you’ve got some confidence that you won’t run out of rations or shrivel up from dehydration. I usually create waypoints for water and resupply locations to transfer onto my GPS unit, and I also mark these on a paper map. Can’t be too careful.
N0. 6: Figure out how you’ll navigate you bikepacking route
If you’ve never before tried to navigate with anything beyond trail signage on popular trail systems, this can be a fun learning process. Navigating with a map while riding is challenging — you’ll find yourself stopping repeatedly to squint at the map, trying to figure out where you are and what junction you might be at.
Because of this, most bikepackers just mount GPS units like the Garmin eTrex series on their handlebars with an uploaded track — then literally follow the line. Add in a topographic base map and you’ve got quite a bit of information on that tiny screen right in front of you.
Smartphone apps offer similar navigation options, but battery life is far more limited, and if you happen to crash, your phone’s integrity will be put in serious jeopardy.
My preference is to follow a track on my GPS unit, have tracks and maps also loaded on my phone (using the Orux app), and to also carry paper maps. Always have a back-up navigational strategy!
N0. 7: Develop an itinerary
After you’ve done all your homework, the next step is to construct an approximate itinerary. Where do you estimate you’ll be at the end of day 1 or day 2 and, more importantly, is reaching that evening destination actually reasonable?
The pacing chart below offers some general guidelines for how many miles you might plan to cover in a day based on the type of route and how you identify as a rider.
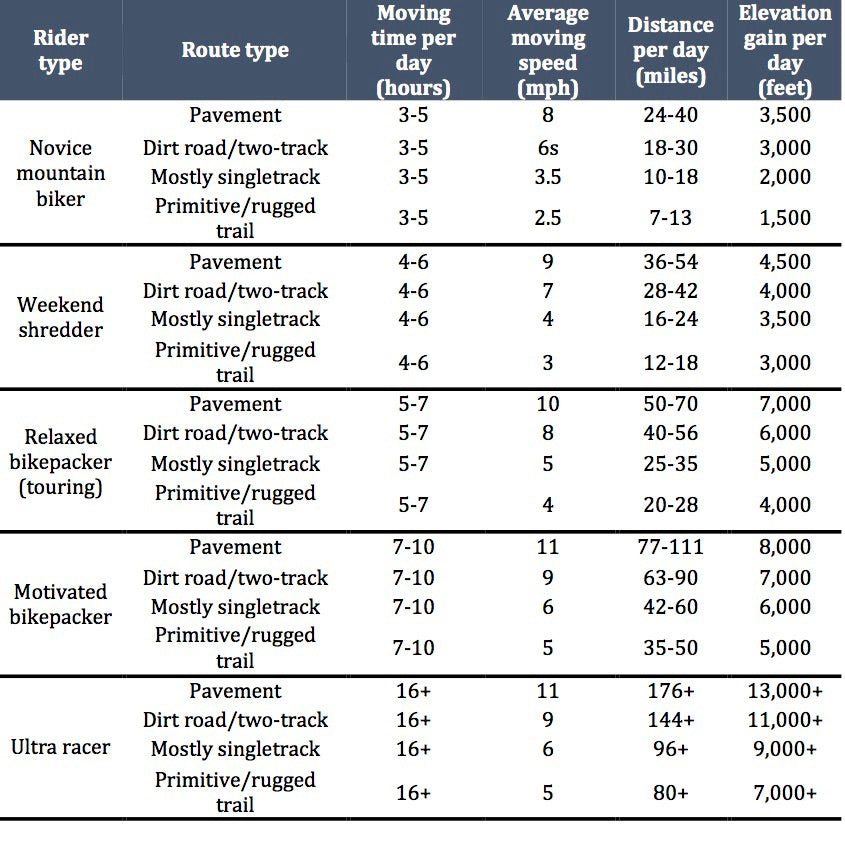
Although it’s important to remain flexible with daily progress while out on the trail, one of the most common means by which trips get derailed is because folks overestimate how far they’ll be able to get each day. I’ve been guilty of that on many, many trips, and it often ends up requiring some creative re-routing on the fly to make it to the trip’s endpoint in the allotted amount of time.
N0. 8: Create contingency plans
Should things not go as planned, how might you quicken up your pace by hopping onto better roads? Where are the nearest off-route communities should you need to bail out for one reason or another? Where are the nearest bike shops should your bike become uncooperative? And where are the nearest medical clinics should something more unfortunate happen?
Doesn’t matter if it’s your first or eighteenth multi-day bike adventure, you will be setting yourself up in the best ways possible to have an experience that meshes with your trip goals, to be adequately prepared for what you’ll find on the ground while pedaling, and to cover the entire route that you plan to ride in the time you have available, if you get down and dirty in the details and plan, plan, plan.
Check out Kurt Refsnider’s original article on adventure-journal.com. If you enjoyed this story on planning a bikepacking trip, you might enjoy our post on The Ten Best Mountain Biking Destinations in the Western United States.
If you find our content useful, please consider buying us a cup of coffee. We appreciate your support!